


Showing posts with label Windows. Show all posts
Showing posts with label Windows. Show all posts
Windows Shortcut Keys...
 | | 

 |

01 . [F1]
Display Windows Help.
02. [F2]
Rename.
03. [F4]
Display the items in the active list.
04. [F5]
Refresh.
05. [F12]
Save As.
06. [Ctrl] + [N]
New Window.
07. [Ctrl] + [O]
Open.
08. [Ctrl] + [c]
Copy.
09. [Ctrl] + [v]
Past.
10. [Backspace]
Go Back.
11. [Windows] + [Space Bar]
It will make all the open windows
transparent and you can view your desktop icons.
12. [Windows] + [D]
you can view or hide your desktop
through this key.
13. [Windows] + [Left/Right arrow]
You can dock the selected window to
left or right side of the screen.
14. [Windows] + [Up/Down Arrow]
Through it, you can minimize,
maximize or restore the selected windows.
15. [Windows] + [Tab button]
This key key launches the 3D
representation of the opened windows and by pressing the Tab again, you can
flip through the windows.
16. [Windows] + [B]
It deliver your focus to the hidden
icons in the system tray.
17. [Windows] + [R]
Open the Run dialog box.
18. [Alt] + [Ctrl] + [Tab] +
Up/Down/Left/Right arrow
To flip the Windows, you can use
this shortcut key.
19. [Windows] + [T] or [Windows] +
[Shift] + [T]
The key shows you the icons in the
task bar menu. holding the [Windows] and keep on pressing [T], you can move
through the items from left to right. With the addition of [Shift] key, you can
move in items from right to left.
20. [Windows] + [Shift]+[1 –> 9]
You can start travelling between the
respective taskbar icons.
21. [Windows] + [Shift]+[Right/ Left
Arrow]
Through this key, you can move the
select window from one monitor to another.
22. [Windows] + [P]
You can use the key to select the
display presentation mode.
23. [Windows] + [+ or –]
You can magnify, zoom in or out of
your screen.
24. [Ctrl] + [Alt] + [L]
You can switch on the Lens mode of
the window.
25. [Ctrl] + [Alt] + [F]
To back from the docked or Lens
mode, Use this key.
27. [Ctrl] + [A]
Select All
28. [Ctrl] + [Z]
Undo
29. [Ctrl] + [Y]
Redo
30. [Ctrl] + [X]
Cut
Creating Bootable Windows 7 Install USB Flash Drive or DVD Using Windows 7 USB/DVD Download Tool
| |
|
SYSTEM REQUIREMENTS :-


Read more ...
* Windows XP SP2, Windows Vista, or Windows 7 (32-bit or 64-bit).
- * Pentium 233-megahertz (MHz) processor or faster (300 MHz is recommended).
- * 50MB of free space on your hard drive.
- * DVD-R drive or 4GB removable USB flash drive.
<===================================================>
- After that you waht to download the Windows 7 USB/DVD Download tool installation file.
- Click Hear to Download it.
- When you are prompted to either save the file to disk or run it, choose Run.
- Follow the steps in the setup dialogs. You’ll have the option to specify where to install the Windows 7 USB/DVD Download tool and whether to create shortcuts on your Start Menu or Windows Desktop.


How to use the tool :-
- Click the Windows Start button, and click Windows 7 USB/DVD Download tool in the All Programs list to open the Windows 7 USB/DVD Download tool.
- In the Source File box, type the name and path of your Windows 7 ISO file, or click Browse and select the file in the Open dialog box.
- Select USB to create a copy on a USB flash drive or DVD to create a copy on a DVD disk, then click Next.
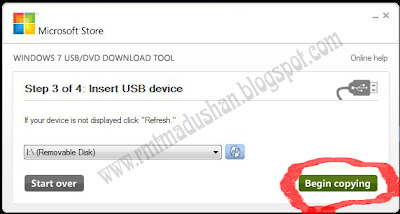
- If you are copying the file to a USB flash drive, select your USB device in the drop down list and click Begin copying. If you are copying the file up to a DVD, click Begin burning.
- First of all your USB pen drive want to format... ( empty USB drive )


If your USB disk space is not enough this error msg is showing... in that time click Erase UDB Drive for clean it....

After you create a Bootable USB drive you can install Windows 7 to your PC..
Read More :- Windows 7 USB/DVD download tool
¸.•*´¨`*•.¸¸.•*´¨`*•.¸¸.•*´¨`*•.¸¸.•*´¨`*•.¸
Subscribe to:
Posts (Atom)